PREPARING CABINETS FOR REFACING
EMPTY CABINETS
|
Before starting any reface project it is always a good idea to empty all of the cabinets. This is a necessary step for two reasons. First, you don’t want to risk damaging any contents in the cabinets. Secondly, cleanup will be easier once the job is finished.
Though the thought of emptying out cabinets may seem like a major chore, (and it is), it can also be an opportunity to clean or weed out items you don’t need or use anymore. In the long run you will be happy you spent the time to do some re-organizational spring cleaning. |
|
CLEANING
This is one of the most critical steps of the entire reface process. It has and will be said many times in this installation guide that your laminate adhesion is only as good as the surface you are adhering to. Cleaning is the key. Though it is a very easy step in the reface process be sure to take the time to do it well.
You should start by wiping down all laminating surfaces with a damp rag. If you notice any areas that need special attention, (especially dirty), then be sure to scrub them until fully free of residues with a mild soap, like Dawn, and water as needed.
The most important reason for cleaning is to remove ALL grease and oils from the laminating surface. By doing this you will ensure a strong adhesion of the laminate to the cabinet boxes. Remember, the length of time a reface will last depends completely on how well the laminate adheres to the surfaces.
On occasion you may need to use a de-greaser like 409 to remove caked on, or stubborn grease. Be sure to rinse off cleaner residue with a damp rag before laminating as these products are also good at removing adhesives. Allow surfaces to dry completely before you begin the next step in the process.
|
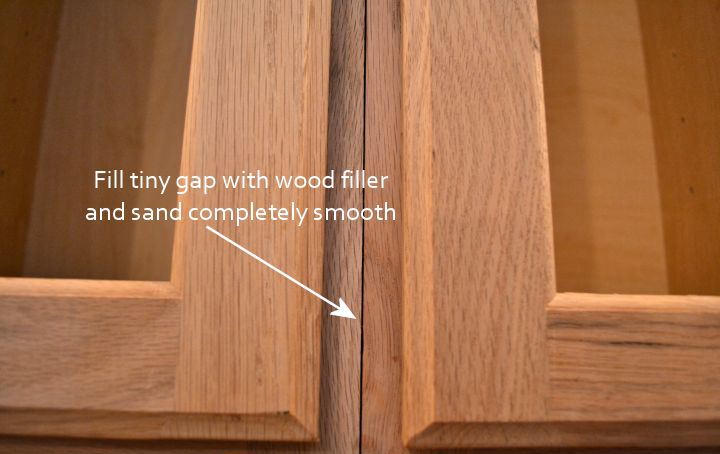
LEVELING OF JOINT SURFACESSometimes you will have small gaps in between cabinets. You may also have two cabinets where the edges are rounded. In this type of situation you will want to use wood putty or joint filler to fill in the voids. After you fill in the joints and the putty or compound is dry you will want to sand the area smooth.
The purpose for this is so that the Peel & Stick laminate won’t telegraph the line or void. This process will also work when you have areas with chips or dents. Be sure to use a wide enough putty knife and a fast-drying compound or putty. |
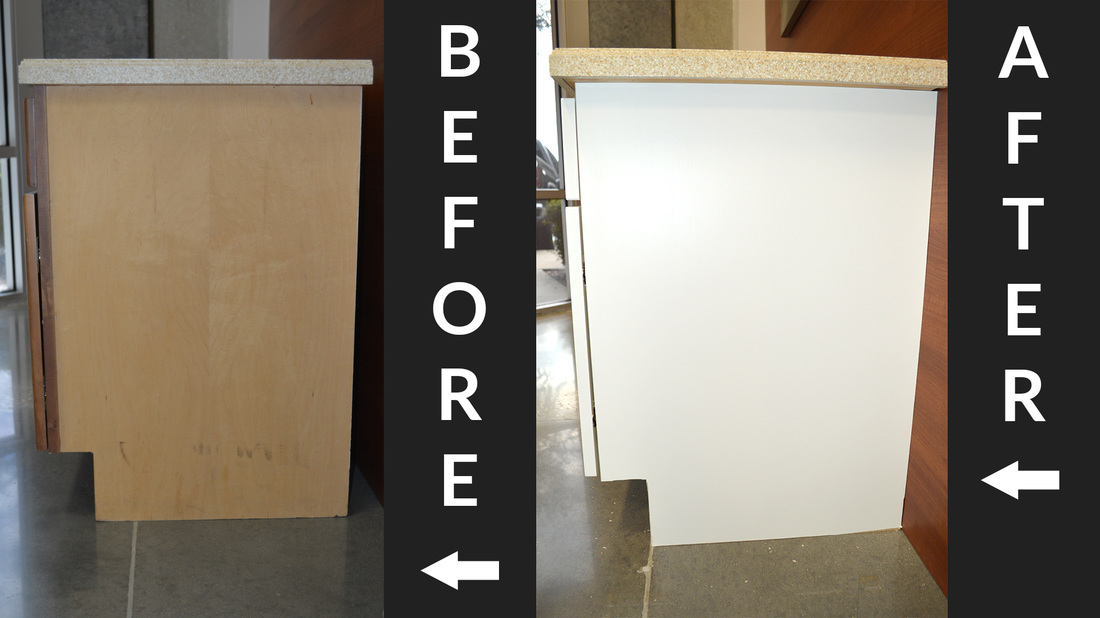
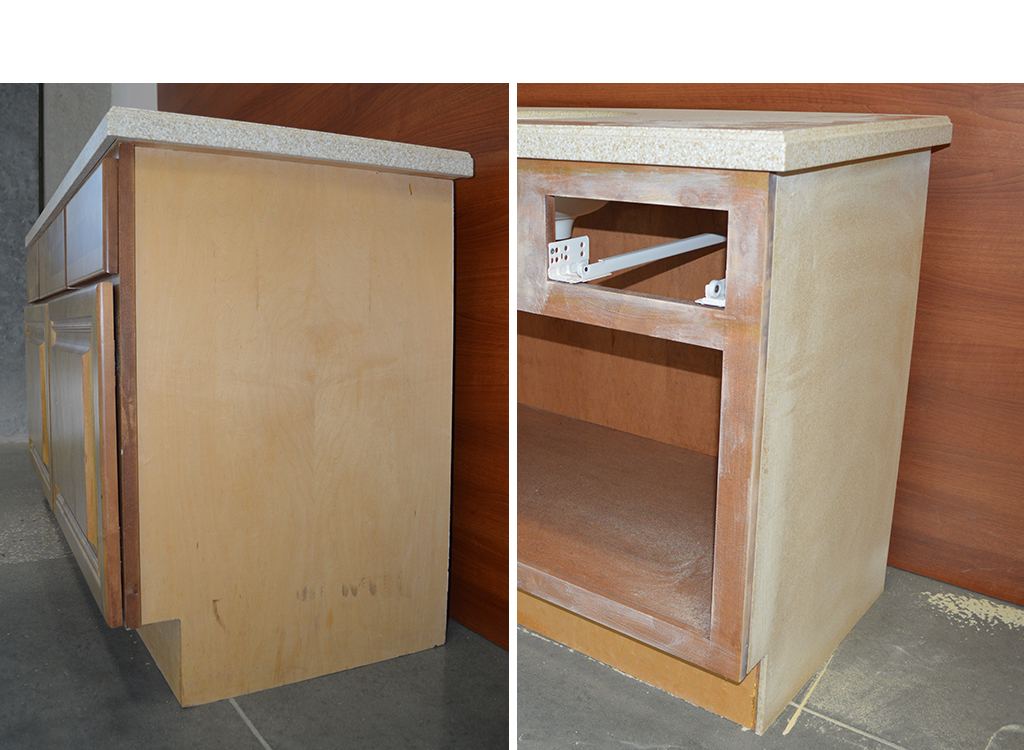
PAD OUTSPad outs are necessary for the sides of face frame cabinets because the frame sticks out anywhere from 1/8 to 1/4 of an inch. Though you can technically laminate the panel separate from the frame, you will not be able to laminate the small lip on the back side of the frame that is exposed. For this reason you will want to add a thin panel commonly referred to as a pad out. The panel material itself is sold at any major home improvement store and comes in 4x8 sheets. To save time make sure the panel material purchased comes with at least one side finish grade. This will save sanding time.
|
|
The side panel is easy to cut with a skill saw, jig saw, or router. It can be secured to the cabinet with glue like liquid nails and/or a small pin nailer. Sand the joint to create a smooth and seamless joint between the filler panel and the edge of the face frame. See diagram below for how the outside edge should look before & after.
|
SANDING OF ADHESION SURFACEStep 1: Now that the laminating surfaces have been cleaned of dirt & grease it is time to do some light sanding. Using a sanding block, made from a piece of flat scrap wood and wrapped in course grit sand paper, lightly scuff all surfaces that you are about to reface. The reason you need a firm sanding block is so you won’t accidentally round any edges. When laminating you want sharp crisp edges for best adhesion. The object here is to rough up any smooth or slick surfaces so a better bond can be formed with an adhesive. Again, this is not a thorough sanding, only a scuffing.
Step 2: For Smoothing out joints or lines it might be easier to use a small palm sander. If you use a sander be sure to use a finer grit paper and keep the sander perfectly flat so as to not round edges or create divots in the adhesion surface. Please note: Divots could telegraph through the laminate so be careful with any sander. Step 3: (NOT REQUIRED) EXPERTS AT SANDING WITH BELT SANDERS ONLY FOR THIS STEP. A belt sander can be used for smoothing surfaces. It should be pointed out that even though a belt sander can save a lot of prep time, it should ONLY BE USED BY INSTALLERS WHO ARE REALLY GOOD WITH A BELT SANDER. If you are unsure if you have the skill to use a belt sander properly on a small surface, then belt sanding is not for you. Take the time to use a palm sander like the one in step 2 until the prep is done. A belt sander has the ability to remove a lot of material really fast and for these reason only skilled sanders who use them all the time should use one to prep for reface. NOTE: If refacing is part of your occupation. You should consider mastering the belt sander technique as it will pay off in time savings for those refacing on a daily basis. |